Ultimate Easy Homemade Pizza Dough Recipe
You might be asking yourself what a homemade pizza dough recipe is doing on a site about outdoor cooking. Well that’s exactly where it belongs because some of the best pizza is made outdoors! In fact, my two favorite ways to make pizza are on my grill and in a dutch oven. If you’re planning to cook indoors that’s fine too. This homemade pizza dough recipe works great with any cooking method.
The Recipe
All you need:
1 cup warm water (not hot)
1/2 tsp salt
1 tsp sugar
1 tsp yeast
2-3 cups bread flour (Regular flour will work too)
1 Tbsp Olive Oil
Proofing the Yeast
To start we proof some yeast. Don’t let this step scare you, it’s incredibly easy. For simplicity sake I normally proof with my full volume of water and the recipes sugar and salt. This isn’t required, but it makes it super easy. Line out all of your ingredients except for the flour and olive oil.

Then, mix them together and let it sit for 10 – 15 minutes.

Once the yeast has been proofed you should see a foamy head on it like in the picture below. This tells you the yeast is active and ready to do it’s work.

Adding the Flour
If you have a large stand mixer with a bread hook this is the perfect place to use it. Pour your yeast mixture into the stand mixers bowl, attach the bread hook, add the first 2 cups of flour and turn it on. Once it’s mixed keep adding a little bit of flour at a time until the dough is no longer sticking to the walls of the mixing bowl. Be careful not to let the mixer run too long, more on that later.
If you don’t have a stand mixer, fear not, kneading by hand isn’t bad and builds good arm strength. Add the first cup of flour to the yeast mixture and stir it up with a whisk or spoon. It should form a thick but still liquid mixture. If using a whisk switch to a spoon at this point. Add the second cup of flour and mix in. After this it should be starting to look like a sticky dough. Keep adding a little bit of flour and mixing until it begins to pull away from the edges of the bowl.
At this point I pour some flour on the counter top and dump my dough out to work by hand. Keep your hands and the counter top covered in flour to avoid sticking and begin folding and rolling the bread and mixing in the remaining flour.
Kneading
Kneading is the step that will determine the chew and bite consistency of your crust. What is happening is the gluten molecules that have been absorbing water are starting to tangle up. Kneading helps form them into a mesh that gives the dough its stretchy characteristic and gives the crust it’s chewy consistency. Don’t worry, it’s super easy.
If you’re in the stand mixer all you have to do is step back and let it knead the dough for you. Let it run for about 10 minutes. Be careful not to walk away and forget it. The stand mixer has the ability to over knead the bread, destroying the gluten mesh.
If you’re working it by hand just keep folding and rolling the dough. You shouldn’t need to add any more flour at this point. Work it for 10-15 minutes. Doing it by hand you won’t over knead the bread. Here’s a short video by King Arthur Flour demonstrating kneading technique. I like my dough a little drier than they show, but that’s a preference you’ll develop on your own.
At this point work your dough into a ball by cupping and folding the sides down and underneath. You may have to pinch the folds together and roll the ball to get it to form a single solid piece. When done, it should look like this.

Rising
Once you have a nice ball you want to let the dough rise for about an hour or until the dough has doubled in size. I like to coat my dough with a Tablespoon of olive oil at this point and cover the bowl with plastic wrap.


Shaping
Once your dough has risen remove the plastic wrap and push the dough back down with your fingers. Take the dough out and separate into 2 or 3 equal size balls and cover with flour. Working them into the balls they will get very stiff very quick. This is the gluten. Form the balls and let the dough sit for about 10 minutes so the gluten can relax.
Separating into 3 balls will make 8-10 inch pizzas and 2 balls will make 14-16 inch pizzas. Personal preference here but I make these 8-10 inch because they are perfect for my grilled pizza and dutch oven pizza. They also freeze well.
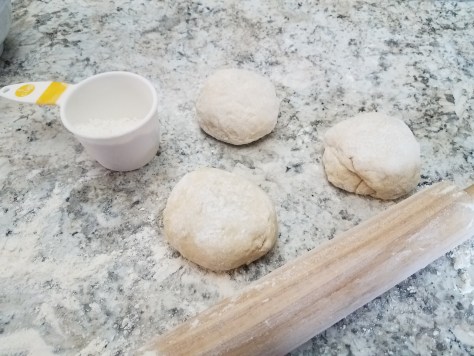
Someone is going to see that rolling pin and comment on here that if you’re not throwing the dough to form it then it’s not really pizza, or something like that. Don’t believe them. I can and do throw pizza dough to form it. Rolling it out works great too, especially for these smaller pizzas.
Keep your working surface and the rolling pin floured and begin rolling while pressing gently. keep turning the dough a quarter turn at a time between rolls to keep it a circle. If you notice it getting out of shape just cup your hands around it and gently push it into shape. The dough should be springy enough that it pulls back in easily.

Final Prep
Take a fork and poke several holes in the dough. This provides an escape for gases while the dough is cooking. Pizza cooks best at high temperature and if the expanding gases have nowhere to go you will get huge crust bubbles.

I’m often making this on my grill or in my dutch oven so I put it on some aluminum foil, sprayed with canola or olive oil spray. hit the top of the crust lightly with spray too and cover with plastic wrap. Let it sit to rest and rise for 10-30 minutes.

That’s it! You’re homemade pizza dough is all ready to cover in sauce and toppings.
Be sure to check out these other related pages.
- Check out my homemade pizza sauce recipe
- Read about making pizza on the grill
- Learn how to make pizza in a dutch oven
- Find out about the time I made 40 pizzas in dutch ovens for my son’s Cub Scout Pack

Did you try my crust? I’d love to hear how it worked for you. Leave me a comment below letting me know or asking any questions. Don’t forget to share this recipe on pinterest with the built in buttons.


