Better Grilled Pizza
Raise your hand if you want to make better pizza. Go ahead, you can admit it. I do. Even if you make beautiful artisan crusts covered with natural ingredients and bubbling cheeses we always want it to be better. Well it’s time to look outside the kitchen because some of the best pizza you can make at home is grilled pizza. In this post I’ll go over some of the best ways to grill pizza, including a fancy pizza oven for the grill and pizza stones and other alternatives. You’ll see that cooking pizza on the grill can not only give you great pizza but can also be a fun way to move your cooking outdoors.

How to Grill Pizza
I have a few methods I use for grilling pizza and I’ll share them all with you today. The one I won’t go into is cooking pizza directly on the grill. First of all there are plenty of articles on how to do that on the internet now. Second is because I believe there is a better way to grill pizza. While the direct heat from the grill will give you a great crust it will normally finish the crust before the cheese is fully melted. I looked at a lot of articles on grilling pizza before making my own. Almost all of them are filled with comments about burnt pizza because the bottom cooks faster than the top. I’m going to show you how to avoid that and make perfect grilled pizza.
What we need is substrate to go on the grill. We want something that can be preheated and absorb a lot of heat, and then quickly deliver it to our crust while providing insulation from the direct heat to give the cheese time to finish melting. Imagine it like this. You’ve preheated your substrate to a toasty 450 degrees and set your pizza on it. Immediately the crust is hit with high heat but as the crust cooks over the first few minutes the substrate cools. Now it has to reheat and will provide some insulation while doing so. This is what gives you that great crust while also giving your cheese time to melt. I’m going to show you a few options for this including one way to do it on the cheap.
Pizza Stone for Grill
I’m going to start here because this is the most obvious cooking substrate for pizza there is. It’s also the one most readers will already have. Take you’re pizza stone outside and follow the methods I outline below to grill some pizza. If you don’t already have a pizza stone and want to get one I would recommend the Weber pizza stone. It’s made by Weber so you know it’s high quality and good for grilling. It also has a built in carrying tray with handles which are extremely handy for carrying your pizza back inside or over to the picnic table. You don’t have to have a Weber grill for this as it will work with just about any grill.

Cast Iron
If you are a regular reader of this site you will know that I’m a huge cast iron fan. It will be even denser and heavier than the pizza stone, which means even more heat retention, making it ideal for cooking pizza. Cast iron is also much more durable than a pizza stone. I’ve heard countless tales of broken pizza stones but I know people still swearing by their hundred year old Griswold skillet. If you have a cast iron skillet then just set it on the grill and preheat. Another option is the lid from a dutch oven. Turn it upside down and the lid is a perfect cooking surface. Or you can get a cast iron pizza pan. These are perfect because they can be used indoors or out and work great for all kinds of baking. I have this one made by camp chef and I love it.

Non-Glaze Quarry Tiles
non-glaze what? Quarry Tiles are a kind of, well, tile – like the kind used for floors and walls. Why in the heck would you put your food on that? To make it better of course! Quarry Tiles are basically clay that’s been formed and compacted, which is a lot like that pizza stone you love. It’s also a common cooking method for pizza. Have you ever seen those nice wood fired pizza ovens at the fancy pizzeria? They have a similar substrate in them.
So what’s so great about non-glazed tiles? Well for starters they’re cheap. Beyond that they are easy to replace. The ones I get are 6X6 so I use 4 to make a 12×12 surface for a small pizza, but they come in a box of over 40 and are less than a dollar a piece each. If one breaks I just pull another one out of the box, unlike that pricey pizza stone. One word of warning, a key word in these is non-glazed or unglazed. That means there is no coating on it. The glaze coating could contaminate your food. Even if you are using something like foil to hold your pizza the heated glaze could emit a gas that you don’t want touching your pizza. Stick with unglazed and you’ll be fine. The ones at this link are safe and the ones I use. These are also great for breads or in your oven.

Pizza Oven for Grill
When I first got turned onto non-glaze tiles by the folks at thepauperedchef.com one of my first thoughts was to build a box with them. This would give you a top to radiate much needed heat down on the pizza. I never build my box, but I do something similar in my oven by putting a second layer of tiles on the top rack. Maybe someday I’ll build a cheap pizza grill box and write a how to post on it, but for now you’re only option is buying one. And yes, someone has made one, or at least something like it.

The pizza oven is designed to go on your grill. It has ceramic plates that are preheated on the grill and then rapid cook your pizza like a traditional wood fired pizza oven. I have to admit, this thing is pretty cool and if I had the money for it I would probably get one. It’s not cheap though so be warned before you click the link to find out how much it costs.
How to Grill the Best Pizza
My method to grill pizza will work great with any of the substrates I mentioned above. I’ve personally used both the quarry tiles and several pieces of cast iron. In fact I’ve been cooking three pizzas while writing this post, which should tell you how easy this really is. I break this down into four easily repeatable steps that you can follow.
- Preparation
- Placement
- Pre-Heating
- Heat Retention
Preparation
We start with preparation. Grilling pizza can be fast paced and the last thing you want to do is burn one pizza while topping another. I always try to get all of my pizzas lined out ahead of time. This isn’t as critical if you are just making one of course, but who eats just one pizza? I also use foil. This allows you to quickly and easily move pizzas from your staging area to the grill, and to remove them from the grill. If you want to stick with the traditional method of a pizza paddle then that is great, I just find the foil to make it a lot easier.

On a side note, I’m talking about how to make it but I know some of you may be looking for recipes. Pizza is pretty easy, crust + sauce + cheese + toppings. Did you notice that crust and sauce are links? Those are my recipes for great homemade pizza dough and sauce.
Placement
The second important piece is placement. You will want your cooking surface to be away from direct heat. On a round, rectangular, or square charcoal grill this is in the center with the coals all pushed to the sides. In a gas grill you have a little more freedom and can go either in the middle or to one side. With gas you can use the burners under the cooking surface to help preheat it and then turn it down or off during cooking.
Here’s how I set my cast iron pizza pan up on my gas grill.
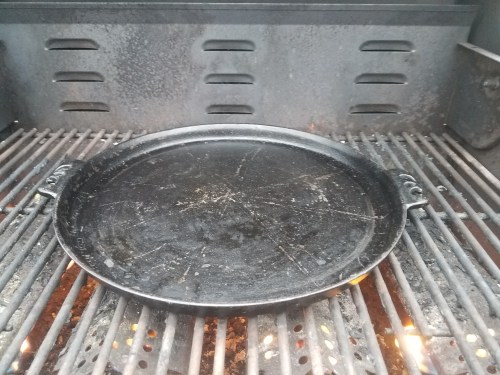
Pre-heating
The single most important step will be pre-heating. You want to let the substrate get nice and hot. The heat it absorbs will transfer into your crust. The hotter it get’s the fluffier, chewier, and crunchier your crust will be. It will be hard to get it hot enough to burn your pizza without direct heat.
Heat Retention
Finally, as hard as it may be, try to avoid constantly checking your pizza. To get hot enough to properly melt the cheese the lid must be closed. Heat will escape every time you open the lid and your pizza will suffer. If you must check it please try to just crack the lid and peak in. A hot grill will cook a pizza in 7 – 10 minutes. It’s OK to check and possibly rotate your pizza at the 5 minute mark, but not before.
Homemade Grilled Pizza
I’m telling you this stuff is good. No, I mean I’m eating grilled pizza right now and it’s fantastic . I needed a few extra pictures for the post so…
Seriously though, this is great pizza and anyone can do it. I give you an easy sauce recipe, an even easier dough recipe, and everything you need to turn your backyard into a perfect pizzeria.


Wait, I need your help
Please give me some feedback on this article, or if you enjoyed it please share it on Facebook and Pinterest with the buttons below. Did you try it and have success? Failure? Let me know in the comments below. I’d love to talk to you, and if you had challenges maybe we can talk through them and help you make great pizza!


